The Best Ways To Display Camp Photos At Home
Turn camp photos into keepsakes: curate 12-24 prints, prep files, use archival materials, and hang at 57-60 in for lasting memories.
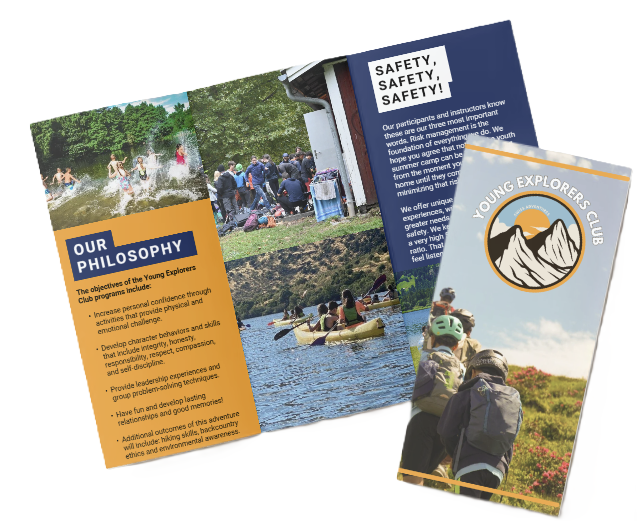
Turning Camp Photos into Physical Displays
We turn camp photos into physical displays by curating 12–24 prints and choosing formats like gallery walls, ledges, hero images, shadow boxes, photo books, or digital frames. That makes memories visible, touchable, and ready to spark conversation. Files need prepping: crop to the final aspect ratio, set 300 DPI at output size, convert to sRGB, apply output sharpening, and order a test print. Choose durable papers and pigment inks, add archival matting and backing, and hang with correct spacing, a centerline at 57–60 inches, plus low‑UV lighting to protect prints while keeping impact.
How We Curate
Choose a focused set
Reduce an overwhelming digital archive to a coherent, story-driven display by selecting a focused set of images. Typical counts:
- 12–24 prints for a full, varied display.
- 3–5 prints for small clusters or ledges.
Display Options
Match the display to the room and use
Pick a format that fits the space and how the room is used. Options include:
- Gallery walls — flexible groupings, typically 3–15 frames.
- Ledges — great for easy rotation, usually 3–6 prints.
- Hero images — one large print that anchors a space.
- Shadow boxes — add small artifacts for context.
- Rotating digital frames — change the story without rehanging.
- Yearly photo books — archive a season in print form.
Preparing Images for Print
Step-by-step prep
- Crop to the final aspect ratio you plan to print.
- Target 300 DPI at the final output size so prints are sharp.
- Convert files to sRGB unless your lab specifies another color profile.
- Apply output sharpening appropriate for the paper and print size.
- Order a test print before committing to a full run to check color and detail.
Materials and Preservation
Choose durable options
Select papers like matte or luster with archival quality and prefer pigment inks for longevity. For framing, add archival matting and backing. For high-value prints, consider museum glass to reduce UV and reflection. Avoid direct sun and use low‑UV lighting where possible.
Hanging and Spacing
Practical hanging tips
Maintain correct spacing for visual balance. A common guideline is to place the display centerline at 57–60 inches from the floor. Measure spacing between frames consistently and plan the layout on the floor before hanging.
Budget and Timing
Plan for lead times
Consumer prints can arrive in days, while professional labs and custom framing can add weeks and cost more. Factor in time and budget for test prints, framing lead times, and shipping.
Key Takeaways
- Print and curate a focused set (12–24 prints or 3–5 for small clusters) to turn an overwhelming digital archive into a coherent, story-driven display.
- Match display style to the room and daily use: gallery walls (3–15 frames), ledges (3–6 prints), hero images, shadow boxes, rotating frames, or yearly photo books.
- Prepare images for print: crop to final aspect ratio, target 300 DPI at final size, convert to sRGB (or follow lab color specs), apply output sharpening, and order a test print.
- Use appropriate materials and preservation: pick matte or luster and archival papers, use pigment inks for longevity, add archival matting/backing, consider museum glass for high-value prints, and avoid direct sun.
- Plan budget and timing: consumer prints arrive in days, pro labs and custom framing add weeks and cost — factor in test prints and framing lead times.
Why Display Camp Photos at Home
We, at the young explorers club, scrolled through our phones and realized we had over 1,200 camp photos, yet the only ones we ever saw were thumbnails. That backlog is why printing and displaying matters. Physical photos reinforce memory recall and family storytelling in ways that images hidden on phones do not. Digital files sit searchable but invisible; printed displays sit where everyone sees them, touches them, and talks about them.
Printed camp photos make stories stick. A framed shot on the hallway wall prompts a five-minute tale at breakfast. A photo book pulled from the shelf invites siblings to compare badges and laugh about mud puddles. If your phone holds 500–2,000 photos, you can curate 12–24 prints to create a meaningful display. That small selection turns an overwhelming library into a focused narrative.
Why this approach helps:
- Prints act as daily prompts. Families remember details far better after seeing images repeatedly in physical form.
- Photos become social artifacts. Guests ask, kids point, grandparents reminisce.
- Tangible images reduce screen fatigue. They give a tactile counterpoint to scrolling and quick likes.
- A thoughtful display preserves camp moments as part of home life, not just as files to archive.
Why prints matter
Inefficient digital hoards hide stories. We forget many moments because they live in folders and cloud backups. A few well-chosen prints change that. They anchor memory in space and time. We recommend curating by theme: friends, activities, milestones, and candid moments. Limit choices to what tells a short story per frame. That keeps the display coherent and conversation-ready.
Choose durable print options. Matte paper reduces glare in sunlit rooms. Metallic or luster finishes boost color for action shots. Consider archival inks if you want decades of color fidelity. Add simple captions with names, dates, or a one-line note to trigger stories at a glance.
Practical display ideas
Use one of these straightforward setups to turn prints into conversation starters:
- Gallery wall: Pick a hallway or stairwell. Arrange 12–16 prints in consistent frames. Use three sizes (8×10, 5×7, 4×6) for rhythm. Keep spacing even and hang at eye level for the most impact.
- Rotating frame or clip rail: Swap new prints each month to keep the display fresh and include recent camp highlights.
- Photo book collection: Bind 12–24 curated photos into a single book per year. Store on the living-room shelf so family members can pull it out anytime.
- Ledge or shelf display: Lean framed prints on a thin picture ledge. Mix in small mementos like a badge or ticket stub for context.
- Collage board: Create a tactile board with prints, captions, and small keepsakes. Kids can help arrange it and add notes.
- Digital-print hybrid: Use a single framed print as an anchor, then place a small tablet nearby with a slideshow for extended galleries.
For inspiration on how to preserve those moments and lay out a display that invites storytelling, see preserve memories.

Best Display Styles and Use Cases (Gallery Walls, Ledges, Hero Images, Shadow Boxes, DIY and Digital)
We, at the young explorers club, favor display choices that fit space, routine, and the kind of memories you want to keep visible. I’ll walk through the main styles and where they work best, and give clear, actionable guidance on sizing and counts.
Gallery walls
Gallery walls work great in living rooms and hallways. They let you mix canvas prints, framed photos, and small artifacts. Aim for a cohesive palette and varied frame sizes to keep energy without chaos. A full wall is best with 5–15 photos; small clusters feel deliberate with 3–5 frames. We recommend centering the arrangement at about 57–60 inches from the floor to the centerline for comfortable viewing.
Photo ledges
Photo ledges are the go-to in small rooms or tight spaces. They keep the floor clear and let you swap prints without rehanging. Use a 3–4 foot ledge to hold 3–6 prints; choose 8–14 inch depth for 8×10 or smaller prints and leave 2–3 inches of ledge on either side of the largest print. Ledges also suit seasonal rotations and kids’ art.
Hero images
A single framed hero image gives a clean, calming focal point in a small room or above a sofa. Pick a scale that matches the wall—common sizes are 24×36 or 20×30—and hang the center at 57–60 inches eye level. Pair a hero print with a smaller digital frame to cycle extra shots without clutter.
Shadow boxes
Shadow boxes add depth and narrative. Reserve them for a few standout trips or objects. A 1–3 inch depth accommodates pins, wristbands, and small gear. Display only a handful per wall so each story reads clearly.
DIY formats
DIY formats add playful flexibility to bedrooms and children’s rooms. A clipboard wall with 6–10 clipboards lets kids swap work and photos fast. Photo garlands with clothespins can show 12–30 images along a 6–10 foot line and look great above beds or windows.
Albums and printed spreads
Albums and printed spreads solve storage and quiet viewing. Plan 20–40 spreads in 8.5×11 or 10×8 sizes to capture a single season or camp session. For ideas on documenting those moments, see creating lasting memories.
Digital frames
Digital frames give big capacity in a small footprint. Models like Aura, Nixplay, and Skylight pair well with a hero printed image to keep a rotating set of camp shots on display. Expect prices from $50–$300; Wi‑Fi models such as Aura and Nixplay often sit between $150–$300 for 9–15 inch screens.
Quick sizing and counts
- Gallery wall: 3–15 frames (full wall 5–15, small cluster 3–5)
- Photo ledge: 3–6 prints per 3–4 ft; ledge depth 8–14 in; allow 2–3 in side margin
- Hero image: common sizes 24×36 or 20×30; center at 57–60 in eye level
- Albums: 20–40 printed spreads; sizes 8.5×11 or 10×8
- Clipboard wall: 6–10 clipboards for flexible swapping
- Photo garland: 12–30 photos along a 6–10 ft line
- Shadow boxes: 1–3 in depth for small 3D camp artifacts
- Digital frame: $50–$300; Wi‑Fi Aura/Nixplay models $150–$300 for 9–15 in screens

Preparing Images for Print and Choosing Materials & Labs
Step-by-step file prep
We, at the Young Explorers Club, follow a clear checklist before sending images to a lab. Use these steps to get reliable prints every time:
- Crop to the target aspect ratio (3:2 for 4×6, 4:5 for 8×10) so composition won’t shift at print.
- Confirm pixel dimensions at 300 DPI for small/medium prints; examples: 4×6 = 1200×1800 px, 8×10 = 2400×3000 px, 16×20 = 4800×6000 px. Aim for 300 DPI; accept 150 DPI minimum for very large prints.
- Convert to sRGB unless your chosen lab specifies a different profile. Use soft proofing if you have a color-managed workflow.
- Apply output sharpening tuned for print (Unsharp Mask or Smart Sharpen). Make subtle adjustments and preview at 100%.
- If an image is under-resolved, crop tighter, upscale with dedicated software like Topaz Gigapixel AI, or choose a smaller print size.
- Save for the lab: high-quality JPEG at max quality for most consumer labs; use TIFF for archival prints or pro labs that request it.
Materials, longevity and lab choices
Choose paper or substrate based on how the final piece will be used. Glossy gives punchy color and contrast. Luster reduces glare and is family-friendly. Matte reads as refined and frames well. For fine art or archival work consider baryta or fiber-based papers from brands like Hahnemühle and Canson. Canvas adds texture and presence. Acrylic face-mounts and metal (dye-sublimation on aluminum) give a modern, durable look.
Expect different lifespans: pigment prints typically last 60–200+ years, while dye prints age faster, often 10–20 years (Wilhelm Imaging Research). Use that benchmark when you want longevity. Labs that print with pigment-based inks on archival paper will give the longest-lasting results.
Balance cost and quality based on the project. Typical retail ranges are:
- 4×6: $0.10–$1.00
- 5×7: $0.50–$2.00
- 8×10: $2–$10
- 11×14: $8–$25
- 16×20 canvas: $30–$150
- 16×20 metal/acrylic: $70–$250
Remember that custom framing often adds $50–$300+.
For bulk family prints use consumer labs for speed and price. For gallery-quality canvas, metal, or archival pigment prints choose pro labs. Examples we trust include:
- Mpix
- Printique (Adorama)
- Nations Photo Lab
- Bay Photo Lab
- Artifact Uprising
If you want guidance on displaying and preserving those camp moments, see our piece on creating lasting memories.

Framing, Mounting, Layout, Hanging and Light & Preservation
Framing, matting and mounting
We, at the young explorers club, treat camp photos like keepsakes and build displays that protect and highlight them. Standard frame sizes work best for quick decisions: 4×6, 5×7, 8×10, 11×14, 16×20, and 20×30 (remember matted sizes add the mat width). For balance, choose a mat width 2–3 inches for smaller prints and 3–5 inches for larger works. Use archival matting and acid-free backing and opt for PVC-free mounting materials to stop chemical degradation. For badges, badges and tee shirts, pick a shadow box with 1–3 inches of depth so items sit naturally.
Glass type shapes both look and longevity. Regular glass is fine for casual walls. Anti-reflective glass improves viewing in bright rooms. For heirloom prints, choose museum glass that blocks roughly 99% of UV. For long-term value, we recommend pigment inks on archival paper and keep light exposure under about 150 lux while minimizing UV to near zero. Avoid direct sunlight and rotate or remove prints in brighter rooms to extend their life. For inspiration on memory-focused displays, see our piece on creating lasting memories.
Tools, layout, hanging and lighting
Use the following checklist and layout rules to hang confidently and fast:
- Essentials: measuring tape, painter’s paper templates, level or laser level, hammer and drill.
- For renters: Command Strips work for lightweight frames; for anything over 25 pounds, use toggle bolts or proper anchors.
- Spacing rules: allow 2–4 in spacing for clusters or salon walls and 1–2 in spacing for tightly grouped grids. Grids look best with uniform spacing—try 2×2 or 3×3 arrangements first. Salon walls should mix sizes but keep 2–4 in between pieces to read as one composition.
- Hanging height: center artwork at 57–60 in from the floor for gallery-standard viewing. Mark with a painter’s paper template to avoid extra holes.
- Lighting: aim for lower-intensity accent lighting around 50–150 lux for photos and paper. Use LED picture lights or track lighting with dimmers to control intensity. Match the beam angle to the frame size to avoid hotspots.
- Preservation moves: choose museum-grade glass for high-value prints, rotate displayed items periodically, and keep prints away from direct sun and moisture.
We’ll also recommend labeling or small captions for story context. Keep frames consistent in finish for a clean look, or mix frame colors sparingly for a lively salon wall.

Budgeting Examples, Timelines and Quick How-To Checklist
Budgets and timelines to plan for
- Small cluster — about twelve 5×7 prints in basic frames: $50–$200.
- Medium gallery wall — twelve 8×10 prints with mid-range frames: $200–$900.
- Heirloom display — a single 20×30 canvas or acrylic with custom framing and museum glass: expect $300–$1,000+.
Factor in taxes and shipping; custom framing can push the price upward quickly.
Plan lead times into the budget. Consumer lab prints normally arrive in 1–7 days. Professional labs can take 3–14 days. Custom framing usually adds 1–3 weeks. We always account for holidays and peak seasons when booking labs or framers. Order a test print early so you don’t waste money on a full run at the wrong size or finish.
Light and placement affect longevity and perceived value. Avoid direct sun and pick low-UV LEDs for illumination. Rotate prints seasonally to share wear across pieces. If you want more ideas for displaying camp shots, check our guide on creating lasting memories to help decide which format fits your home.
Quick numbered checklist
Follow this concise sequence before you print or hang:
- Curate: pick 12–24 favorite camp photos (or 3–5 for a small cluster).
- Prepare files: crop to the final aspect ratio, set to 300 DPI at target print size, and convert to sRGB or lab spec.
- Test print: order one test print in the intended finish before committing to a batch or expensive substrate.
- Decide display style: choose a hero image, ledge, gallery wall, shadow box, or digital frame.
- Frame/mount: use archival materials if desired and pick the right mat and glass.
- Hang: use painter’s-paper templates and hang centers at 57–60 inches from the floor.
- Light and maintain: avoid direct sun, use low-UV LEDs, and rotate prints seasonally.
We recommend always ordering a test print and adding framing lead time to your schedule. If you want a quick how-to for packing and moving framed prints, ask us and we’ll guide you through the safest options.

Recommended Products, Labs, Papers, Software and Tools (Shopping List)
At the Young Explorers Club, we pick gear and services that make camp photos look intentional and last. I focus on options that scale from quick family prints to archival-grade keepsakes. Below you’ll find the exact labs, framing choices, substrates, software and hanging tools we rely on.
Shopping list — our recommended picks
Here are the categories and specific products we recommend, with short notes to help you choose.
- Photo labs and printing services: Shutterfly and Walgreens Photo or Walmart Photo for fast consumer prints; Mpix for reliable color and quick shipping; Printique (Adorama), Nations Photo Lab and Bay Photo Lab for professional-grade options; Artifact Uprising for premium papers and modern design.
- Framing and mounting: IKEA RIBBA for budget-friendly frames; Framebridge or Michaels for custom framing; local frame shops for museum-quality presentation.
- Recommended papers and substrates: Hahnemühle Photo Rag and Canson Infinity Platine for fine-art matte looks; Ilford Galerie Prestige (baryta) for classic silver-halide tonal range; Epson Hot-Press Bright for crisp inkjet detail. Consider canvas, acrylic face-mount and metal prints when you want alternative looks with strong visual impact.
- Digital frames and lighting: Aura Frames, Nixplay Smart Frame and Skylight Frame. Expect Aura and Nixplay Wi‑Fi frames to range roughly $150–$300 depending on size and features.
- Software for prep and enhancement: Adobe Lightroom and Adobe Photoshop for color control and retouching; Capture One for tethered capture and color fidelity; Topaz Gigapixel AI for clean upsampling when you need larger prints; Affinity Photo as a cost-effective alternative.
- Hardware and hanging tools: Command Picture Hanging Strips for renter-friendly mounting; OOK Picture Hangers for permanence; tape measure, a laser level or a 4-foot level, and kraft paper for full-scale templates before you hang anything.
Practical notes and quick guidance
- Artifact Uprising offers premium papers and modern design that make gallery walls feel current. Mpix is a go-to when we want consistent color and faster turnaround. Nations Photo Lab gives us access to professional finishes and archival options.
- Use Topaz Gigapixel AI only when the original file is too small; it preserves detail but don’t expect miracles from heavily compressed phone JPEGs.
- For mixed-media walls we often pair one acrylic face-mount or metal print with several framed Hahnemühle or Ilford prints to create focal contrast. That mix keeps the display dynamic without overwhelming the room.
Tips for hanging and layout
- Cut kraft paper templates to the exact frame sizes and tape them to the wall to test spacing.
- Use a laser level for long rows and Command strips for lightweight frames; switch to OOK hangers for heavier pieces or family heirloom prints.
- When arranging multiple frames, keep a consistent gap (usually 2–3 inches) and align either centers or tops for cohesion.
Pricing expectations
- Fast consumer 8×10 prints usually run inexpensive; professional labs like Mpix and Nations typically price an 8×10 at about $3–$10 depending on paper choice.
- Custom framing often adds approximately $50–$200 per piece depending on size and matting.
- Digital Wi‑Fi frames and smart displays will commonly fall in the $150–$300 band for most popular models.
For styling ideas and layout inspiration pulled from actual camp stories, see creating lasting memories.
Sources
Wilhelm Imaging Research — Print Permanence and Image Stability
Canadian Conservation Institute — Light, Ultraviolet and Infrared
Getty Conservation Institute — Preventive Conservation: Light and Museums
Architectural Digest — How to Build a Gallery Wall
The New York Times — How to Hang Pictures
Shutterfly — Photo Print Sizes & Resolution Guide
B&H Photo Video Explora — Preparing Files for Print
Artifact Uprising — How to Display Photos at Home
Wirecutter (The New York Times) — The Best Digital Photo Frames


 17")